MLink Installation Guide
Recommended: Disconnecting the battery is the BMW-approved procedure for any airbag work. If you choose to proceed with the battery connected, the airbag system may log fault codes — which typically clear themselves, but if they persist, use ISTA or a compatible OBD tool to clear them.
What's in the Box
• (A) M1 M2 buttons
• (B) Steering wheel cover
• (C) MLink controller
• (D) Wiring harness
• (E) 3-pin connector housing

Required Tools
• 10 mm socket
• 13 mm socket (hybrid models only)
• T20 Torx screwdriver
• T27 Torx screwdriver (or thin flathead)
• Plastic pry tool (or flat-head screwdriver)
• Pin removal tool (or thin screwdriver / toothpick / paper clip)
1Disconnecting the battery
Battery location and disconnection vary by chassis and model — check your vehicle's owner's manual (or a quick search for your exact model) for the correct location. To verify all batteries are disconnected, check that all displays and infotainment are completely dark. Steps 1.1 and 1.2 below are demonstrated on a G20, but the procedure is the same across most models.
All models
Open the boot and locate the battery.

Using a 10 mm socket, loosen and disconnect the negative (−) terminal (1).

MHEV models — additional step
If you have a mild hybrid model (48V MHEV), it has a second battery located in the front of the vehicle — you must disconnect it as well before proceeding.
Open the bonnet and locate the second battery in the engine bay.

Using a 13 mm socket, loosen and disconnect the negative (−) terminal.

2Buttons installation
Remove the airbag
Insert a T27 screwdriver — or a thin flathead — (1) into the bore hole (2) on the rear of the wheel (right side). If the hole is not visible, locate a small indentation in the leather cover and push through it. Once you feel spring resistance, press straight inward to unlock the spring clip.

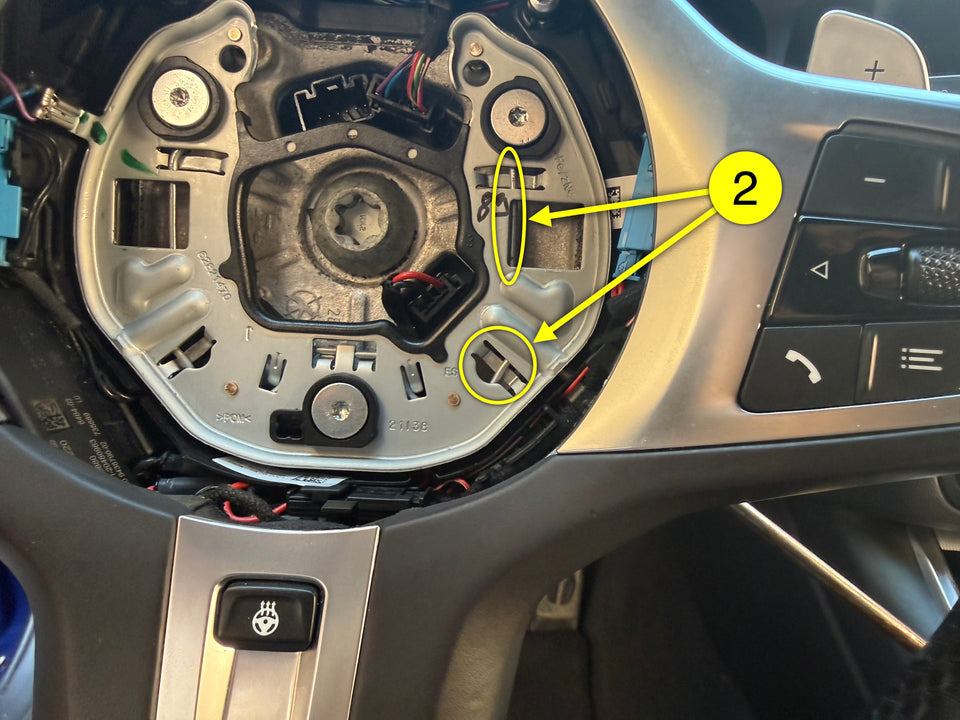
Repeat on the other side.
Disconnect the plug connector (1) and remove the airbag (2).

Remove shift paddles (if equipped)
Release and disconnect the plug connector (1) from its bracket.

Remove the screw (1).

Slide the paddle (1) out together with the cable and remove from steering wheel (2).

Repeat on the right side.

Remove the decorative trim
Remove the two T20 screws (1) on the rear of the steering wheel — one per shift paddle, left and right (accessible after removing the shift paddles).

Gently pull the trim (1) outward with a wiggling motion to release the latches (2,3).

Disconnect the side plug connector (1).

(Heated steering wheel only) Loosen and disconnect the heating plug (1) from its holder and remove the decorative trim (2).

Remove the cover
Remove the cover screws (1) and pull the cover (2) up and off.

Install MLink buttons
Fit the new cover into place.

Install the buttons and secure them using the original screws removed in step 2.4.

Connect the button harness 3-pin connector in-line with the side plug connector (1) from step 2.3c.

Reassemble
(Heated steering wheel only) Reconnect the heating plug (1) to its holder and seat the decorative trim (2).

Press the decorative trim (1) back onto the latch mechanisms (2,3).

Reconnect the trim's side plug connector (1) to the button harness.

Refit the two rear T20 screws (1) — one per shift paddle, left and right.

(If equipped) Slide each shift paddle (1) back in with the cable onto the steering wheel (2).
Tighten the screw (1).

Reconnect and slide the plug connector (1) to its bracket.
Repeat on the other side.
Route the wiring harness to the side — it must not cross the airbag seating area or interfere with any moving parts.

Reconnect the airbag plug connector (1).

Press the airbag (1) with even pressure in the direction of the arrow until it engages audibly.

3Controller installation
Remove the center console trim
Lever the armrest storage compartment trim (1) backwards out of the clamps using a pry tool and remove it.

Pull the centre console trim (1) upward to release it from the latch mechanisms.

Remove the gear selector module
Remove the four T20 screws (1).

Lift the module (1) and disconnect both connectors — the 4-pin (2) and the 18-pin (3).

Remove the gear selector module and set it aside.

Connect the MLink harness
Connect the harness to the MLink controller module via the 6-pin connector.

Plug the harness in-line with the 4-pin connector — match each end to its label: "Purple plug" (1) to the car-side connector, "Gear selector" (2) to the module.

Remove the cover (1) from the 18-pin connector (2).

Using a pin removal tool (2) — or a toothpick / thin screwdriver — release and unpin pin 12 (1) from the OEM 18-pin connector.

Insert the unpinned pin (1) into the centre slot (2) of the 3-pin connector housing (E) from your kit.

Connect the assembled 3-pin connector (1) to the matching connector on the MLink harness (2).

Insert the remaining pin (1) from the MLink harness into slot 12 (2) of the OEM 18-pin connector until it clicks.

Reassemble
Carefully tuck all harness wires into the available space in the centre console — nothing should be pinched or crossing any moving parts.

Refit the cover onto the 18-pin connector, then use the connector lever to push it into the gear selector module until it clicks.

Plug the remaining 4-pin connector (1) into the gear selector module.

Lower the gear selector module back into position and tighten the four screws (1).

Press the centre console trim (1) back down onto the latch mechanisms.

Fit the armrest storage compartment trim back into the clamps.

4Reconnecting the battery
MHEV models — additional step
Reconnect the negative (−) terminal of the front battery in the engine bay.

All models
Reconnect the negative (−) terminal of the boot battery.

5Configuring button profiles
M1 — Sport · DSC ON
M2 — Sport Plus · DSC DTC
M1 + M2 — Comfort · DSC ON
Download the MLink Setup app


Enter configuration mode
Press and hold both M1 and M2 buttons simultaneously for 6 seconds.
Once activated, you have 30 seconds to connect via the app — if no connection is made within that window, the controller automatically resumes normal operation and you will need to repeat this step.

Connect and configure
Open the MLink app, navigate to the Connect tab, and tap Search. Select your MLink controller from the list. Then navigate to the Profiles tab, set the desired drive mode and DSC mode for each profile, and tap Apply changes.
Troubleshooting
Airbag does not sit flush after reinstallation
The airbag clips onto three spring-loaded pins inside the steering wheel hub. If it appears uneven or raised on one side, the pins have likely shifted slightly during reassembly.
Fix:
1. Remove the airbag again (repeat step 2.1).
2. Locate the T20 bolts that hold the spring mechanisms for each pin.
3. Adjust by no more than a quarter turn at a time and recheck seating after each adjustment.
4. Reinstall the airbag and check for even seating.

Buttons do not respond
Verify all connectors are fully seated and repeat the relevant sections if needed.